The Ultimate Guide to Key Lime Pie
History and Origin of Key Lime Pie
Key Lime Pie, a quintessential American dessert, has its roots deeply embedded in the sandy soils of the Florida Keys. Its story begins in the late 19th century, a period marked by the absence of modern refrigeration. This lack of refrigeration meant that fresh milk was a rarity in the Keys, leading to the innovative use of canned milk, specifically sweetened condensed milk, which became a staple ingredient in this iconic pie.
The original Key Lime Pie was a no-bake wonder, a clever concoction that required minimal ingredients and effort. The magic of this pie lay in the chemical reaction between the acidic lime juice and the proteins in the egg yolks and condensed milk, causing the mixture to thicken naturally without the need for baking. This simplicity was not just a matter of convenience but a necessity given the limited resources of the time.
As technology advanced, so did the Key Lime Pie. The introduction of modern refrigeration and concerns over raw eggs led to the evolution of this dessert from its no-bake origins to the baked delight we know today. This transition marked a significant shift in texture and consistency, giving rise to a firmer and more stable filling, while still retaining the pie’s signature tart and creamy flavor profile.
Key Lime Pie in Popular Culture
Key Lime Pie has transcended its humble beginnings to become a symbol of American cuisine. Its presence is felt far beyond the boundaries of Florida, capturing the hearts of dessert lovers across the nation. This pie isn’t just a treat; it’s a cultural phenomenon, representing a blend of simplicity and sophistication.
In popular culture, Key Lime Pie has made numerous appearances in television shows, movies, and books, often portrayed as a symbol of comfort and nostalgia. It’s a regular feature in food festivals and baking competitions, where variations of this classic are celebrated. The pie’s unique flavor and bright, inviting appearance have made it a favorite subject for food bloggers and culinary influencers, further cementing its status as a beloved American dessert. For an in-depth look at its role in popular culture, explore Brown Eyed Baker’s traditional Key Lime Pie recipe.
Understanding Key Limes vs. Regular Limes
The heart of a Key Lime Pie lies in its namesake ingredient: the Key lime. Smaller and rounder than regular limes, Key limes are known for their intense aroma and higher acidity, which contribute to the pie’s distinctively tart flavor. Unlike the more common Persian lime, Key limes have a thinner skin and a higher juice content, which is crucial for achieving the perfect balance of sweetness and tartness in the pie.
The difference in flavor between Key limes and regular limes is significant. Key limes offer a more complex, floral aroma and a sharper, more pronounced tartness. This intensity is what sets Key Lime Pie apart from other lime-based desserts. Using regular limes, while still delicious, results in a milder, less vibrant flavor profile.
The impact of Key limes on the overall taste of the pie cannot be overstated. Their unique flavor is the cornerstone of the pie’s identity, making the use of genuine Key limes highly recommended for an authentic Key Lime Pie experience.
Making Key Lime Pie
Ingredients Overview
Creating the perfect Key Lime Pie begins with gathering the right ingredients. This pie is known for its simplicity, requiring only a handful of components for both the crust and the filling.
For the Graham Cracker Crust:
- Graham Cracker Crumbs: The base of the crust, providing a sweet and crunchy texture. You’ll need about 2 cups, which is roughly 14 full graham crackers crushed.
- Light Brown Sugar: Adds a hint of molasses flavor and helps to bind the crumbs. About ⅓ cup is sufficient.
- Melted Butter: Acts as the binding agent for the crust. Use ½ cup of unsalted butter for the best results.
- Salt: A pinch of salt enhances the flavors of the crust.
For the Lime Filling:
- Sweetened Condensed Milk: The key to the creamy texture of the pie. One 14-ounce can is typically used.
- Key Lime Juice: Fresh juice is preferred for its vibrant flavor, requiring about ½ cup.
- Key Lime Zest: Adds an aromatic citrusy flavor. About 4 teaspoons should do.
- Egg Yolks: They thicken the filling and add richness. You’ll need 4 yolks.
Substitutes and Variations:
- Crust Alternatives: For a gluten-free option, almond flour or gluten-free graham crackers can be used.
- Lime Juice: If Key limes are unavailable, regular lime juice or bottled Key lime juice can be substituted, though the flavor will be slightly different.
- Sweetened Condensed Milk: For a dairy-free version, coconut condensed milk is a great alternative.
Substitutes and variations are available for those who wish to experiment. For a gluten-free option, check out Healthy Gluten-Free Family’s Key Lime Pie recipe.
Step-by-Step Recipe Guide
Preparing the Graham Cracker Crust:
- Combine Ingredients: Mix the graham cracker crumbs, brown sugar, melted butter, and a pinch of salt in a bowl until well combined.
- Press into Pan: Transfer the mixture to a 9-inch pie pan. Press firmly along the bottom and sides to form an even crust.
- Bake the Crust: Preheat your oven to 350°F (175°C) and bake the crust for about 10 minutes until set and lightly golden. Allow it to cool while you prepare the filling.
Mixing and Baking the Filling:
- Combine Filling Ingredients: In a separate bowl, whisk together the egg yolks and lime zest until slightly thickened. Gradually add the sweetened condensed milk, followed by the lime juice, mixing until smooth.
- Fill the Crust: Pour the filling into the cooled crust, spreading it evenly.
- Bake the Pie: Bake the pie at 350°F (175°C) for about 15-17 minutes. The center should be set but still slightly wobbly.
- Cool and Chill: Let the pie cool to room temperature, then refrigerate for at least 3 hours, preferably overnight, to allow the filling to set properly.
Tips for Perfect Consistency:
- Crust Thickness: Ensure the crust is evenly pressed to avoid uneven baking.
- Avoid Overbaking: Overbaking the filling can lead to cracks. Remove the pie from the oven when the center is just set but still wiggly.
- Chilling Time: The longer the pie chills, the better the flavor and texture. Overnight chilling is ideal.
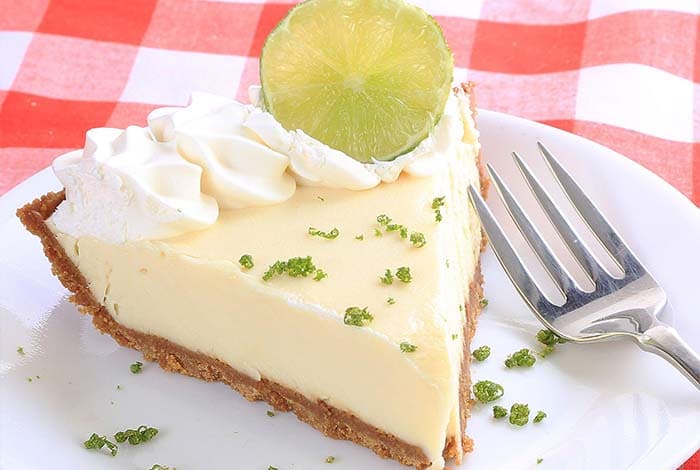
- Serving: Serve chilled. Optionally, garnish with whipped cream or lime slices for an extra touch.
Following these steps will help you create a Key Lime Pie that’s not only delicious but also visually appealing, with the perfect balance of tartness and sweetness, encased in a buttery, crunchy crust.
Toppings and Presentation
The final flourish to a Key Lime Pie is its topping, which not only adds to its flavor but also its visual appeal. The two most popular choices are whipped cream and meringue.
- Whipped Cream: A dollop of freshly whipped cream offers a light, creamy contrast to the pie’s tartness. To make, simply whip heavy cream with a bit of sugar and vanilla until soft peaks form. For an elegant touch, pipe the whipped cream around the pie’s edge or spread it over the top.
- Meringue Topping: For a more traditional approach, a fluffy meringue topping, browned to perfection, is ideal. Beat egg whites with sugar until stiff peaks form, then spread over the pie and briefly broil or use a kitchen torch to achieve a golden-brown finish.
Garnishing Ideas:
- Lime Slices or Zest: Add a few thin lime slices or a sprinkle of lime zest for a refreshing and colorful garnish.
- Berries: Fresh berries like raspberries or blueberries can add a pop of color and a sweet contrast.
- Mint Leaves: A few mint leaves can provide a fresh, aromatic touch.
Storage and Make-Ahead Tips
Key Lime Pie is not only a delightful dessert but also a convenient make-ahead option, perfect for entertaining.
Refrigeration:
- Short-Term Storage: Once the pie has cooled, cover it loosely with plastic wrap and refrigerate. It’s best consumed within 3 days to maintain optimal flavor and texture.
- Pre-Serving Tip: If using whipped cream, it’s best to add it just before serving to keep it fresh and fluffy.
Freezing Instructions:
- Long-Term Storage: Key Lime Pie can be frozen for up to 1 month. To freeze, place the pie, uncovered, in the freezer until solid. Then wrap it in plastic wrap and a layer of foil, or place it in a freezer-safe container.
- Thawing: Thaw the pie in the refrigerator overnight before serving.
Shelf Life Considerations:
- Freshness: The freshness of the ingredients, especially the dairy components, will affect the pie’s shelf life. Always use fresh, high-quality ingredients for the best results.
- Serving: If the pie has been at room temperature for an extended period, especially during warm weather, it’s best to consume it within a few hours to ensure food safety.
By following these storage and presentation tips, your Key Lime Pie will not only taste delicious but also look stunning, making it a perfect dessert for any occasion.
FAQs
Addressing some common questions about Key Lime Pie:
Can I Use Regular Limes Instead of Key Limes?
- Yes, you can use regular limes in place of Key limes, but be prepared for a slight difference in flavor. Key limes are known for their unique tartness and aromatic quality, which are slightly more intense than regular limes. Using regular limes will still yield a delicious pie, but with a milder lime flavor.
What’s the Best Way to Juice Key Limes?
- Key limes are smaller and firmer than regular limes, making them a bit more challenging to juice. A hand-held juicer or a citrus reamer works best. Roll the limes on a countertop before cutting and juicing to maximize the juice output. Since they are small, you’ll need more Key limes than regular limes to get the same amount of juice.
Can Key Lime Pie Be Made Without Eggs?
- Yes, it’s possible to make Key Lime Pie without eggs. The eggs in the recipe are primarily for texture and richness. For an egg-free version, you can use a thickening agent like cornstarch or a commercial egg replacer. Keep in mind that the texture and taste might vary slightly from the traditional recipe.
How Do I Know When the Pie is Done Baking?
- Key Lime Pie is done when the filling is set but still has a slight jiggle in the center. It should not be liquidy or overly firm. Overbaking can cause the filling to crack, so it’s important to keep a close eye on it, especially as it nears the end of the baking time.
Can Key Lime Pie Be Made in Advance?
- Absolutely! Key Lime Pie is an excellent make-ahead dessert. You can prepare and bake the pie a day or two before serving. Just keep it refrigerated until you’re ready to serve. If you’re adding a whipped cream topping, it’s best to add that just before serving for the freshest taste and appearance.
Is Key Lime Pie Gluten-Free?
- The filling of Key Lime Pie is naturally gluten-free, but the traditional graham cracker crust is not. To make a gluten-free version, simply use gluten-free graham crackers for the crust or opt for a crustless version. Always check the labels of your ingredients to ensure they are gluten-free.
This comprehensive guide to Key Lime Pie covers everything from its historical roots to detailed recipe instructions. By understanding the nuances of its key ingredients and following the step-by-step guide, you’re well on your way to creating this iconic American dessert. Remember, the secret to a great Key Lime Pie lies in the quality of its key limes and the love put into its preparation. Enjoy your baking journey!
Classic Key Lime Pie Recipe
Equipment
- 9-inch pie pan
- Mixing bowls
- Whisk
- Electric mixer (for whipped cream)
- Citrus juicer (if using fresh key limes)
Ingredients
For the Graham Cracker Crust:
- 2 cups graham cracker crumbs about 14 full graham crackers
- ⅓ cup light brown sugar
- ½ cup unsalted butter melted
- A pinch of salt
For the Key Lime Filling:
- 4 teaspoons grated key lime zest
- 4 large egg yolks
- 1 can 14 ounces sweetened condensed milk
- ½ cup fresh key lime juice about 20-25 key limes
For the Whipped Cream Topping:
- 1½ cups heavy cream chilled
- ½ cup powdered sugar
- ½ teaspoon vanilla extract
Instructions
Preparing the Graham Cracker Crust:
- Preheat Oven: Preheat your oven to 350°F (175°C).
- Mix Crust Ingredients: In a medium bowl, combine graham cracker crumbs, brown sugar, melted butter, and a pinch of salt.
- Press and Bake: Press the mixture firmly into the bottom and up the sides of a 9-inch pie pan. Bake for 10 minutes, then remove and let cool.
Making the Key Lime Filling:
- Mix Filling: In a separate bowl, whisk together the egg yolks and key lime zest for about 2 minutes. Add the sweetened condensed milk and continue to whisk. Gradually mix in the key lime juice.
- Combine: Pour the filling into the cooled crust.
- Bake the Pie: Bake for 15-17 minutes, or until the filling is set but still slightly jiggly in the center.
- Cool: Remove from the oven and let cool to room temperature, then refrigerate for at least 3 hours, or overnight.
Preparing the Whipped Cream Topping:
- Whip Cream: In a large bowl, beat the heavy cream, powdered sugar, and vanilla extract until soft peaks form.
- Top the Pie: Spread or pipe the whipped cream over the chilled pie.
Serving:
- Serve the pie chilled. Optionally, garnish with additional key lime zest or thin lime slices for a decorative touch.
Notes
- Key Lime Juice: Fresh key lime juice is preferred for the best flavor, but bottled key lime juice can be used as a substitute.
- Egg Yolks: Use the leftover egg whites for another recipe, like meringue cookies.
- Make-Ahead: The pie can be prepared up to 2 days in advance. Add the whipped cream topping just before serving.
- Storage: Store in the refrigerator, covered, for up to 3 days. The pie can also be frozen for up to 1 month.


Leave a Comment